-
Written by

- Published on
- Hits: 23403

Blogging made easy in Joomla
The main JomSocial.com website went through a successful Joomla 1.5 to Joomla 2.5 migration a couple of weeks ago. Some questions pertaining to our blog area were raised, in particular about the component that powers our Joomla blogging system.
Well, it might be a surprise to most of you to know that the Joomla blog component is actually a standard Joomla com_content component. Yes, you heard it right, com_content and its perfectly suitable to be a good Joomla blog extension.
Joomla! is a CMS, Content Management System and within its core is a powerful yet underutilized content publishing system. This is a component that exists since the days of Mambo CMS, gradually improved upon minor iterations with each subsequent releases of Joomla 1.0, 1.5 and the rest. Joomla is pretty much a good blog software in itself.
"What sorcery is this? It doesnt look like com_content at all. This is the com_content that I know."
With a bit of trickery, you can achieve the same layout as ours easily and turn your Joomla website into a Joomla blog community easily.
At the end of the day, you will have:
- A blogging system for free
- A form of free commenting system - Disqus
- Integration with Gravatar as the user avatar
With additional free extensions on Joomla Extension Directory, you could also have:
- Social integration (Facebook Likes, Google Plus, Twitter, Pinterest)
- Tagging system & tag cloud
- Related blogs link at the end of the blog
All these can be done at no cost at all, and with the guaranteed stability of Joomla's com_content, hence freeing you of future upgrade and compatibility issues.
To ease you, we are providing two themes for com_article for your reference throughout this guide. The two themes are:
Avatar - Download link at the bottom of this tutorial
DateTime - This theme will be the basis of our tutorial below.
Taking advantage of Joomla Template Overrides & Template Parameters
'Template override' in the simplest term is a method for you to change the appearance of a Joomla component without having to modify its core files. A more detailed elaboration on template override can be found here, but rest assured that our practical guide here should be sufficient enough to get your started with the basics of overrides.
'Template parameter' is template-based layout configurations that would allow you to change the look at feel of your Joomla template. A more thorough elaboration can be read here.
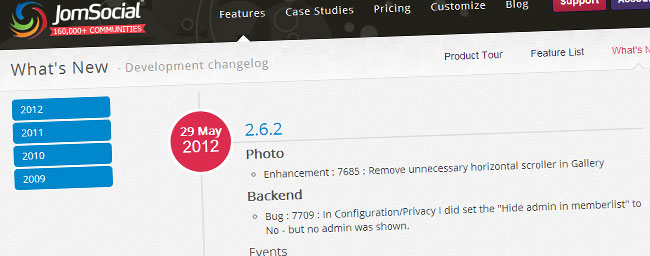
Fusing Joomla template override and template parameter together enables your site to have a wide-variety of content layouts which would make your Joomla article and blog area unique and distinct from other regular Joomla websites. Examples of templating flexibility can be seen throughout our JomSocial.com website. Visit our Documentation, Feature Overview, Feature List and also the What's New area to see how we take advantage of advanced Joomla templating capability.
In this exercise, we are going to modify the appearance of com_content for a particular 'Blog' menu so that whenever the menu is accessed, Joomla will display the articles in a style meant for blogs. To do so, we need to 'override' the output of com_content.
Extending Joomla Template Parameter
Before we start, we need to add a certain configuration into the current Joomla template that you are using. What the configuration will do is that it will instruct Joomla to display a different template when a particular menu item is accessed.
I will be using beez_20 template that is packaged together with Joomla 2.5 in this exercise.
1. Adding new template parameter in Joomla template.
Open and edit 'templateDetails.xml' file in
|- templates/
|--- beez_20/ (or your current template)
In templateDetails.xml, locate this exact code:
Paste this code immediately after it:
The above code will extend the current Joomla template to have a new configuration option. Go to Extensions > Template Manager > beez_20 (or your current template), and you will notice this new option:
2. Create a new Blog category. Once the new configuration is added, we then need to create a new content category for the blog, you may skip this step if you already have one. To make things simple, we shall call it 'blog' category. Create some articles and make sure that they are saved into that category.
To create a new blog category, go to Content > Category Manager > Add New Category. Set the 'Title' as Blog, and the alias as 'blog'.
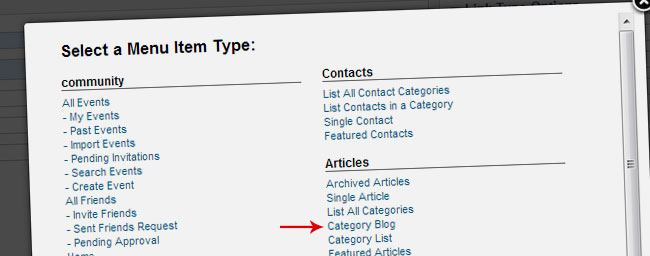
Once you are done, go to Menu > Main Menu > New Menu > Category Blog, and select the 'Blog' category. This option will create a link in your Main Menu and will display all articles within 'Blog' category in a blog-view, ie listing of articles with their intro text.
3. Assigning the template to a specific menu.
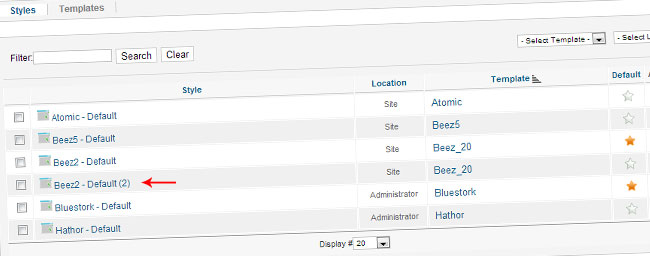
We have extended Joomla's template in Step 1 and now we need to assign it to the new com_content/Category Blog menu in Step 2. Go to Extensions > Template Manager > Select the template > and pick 'Duplicate'. This is what you will end up with:
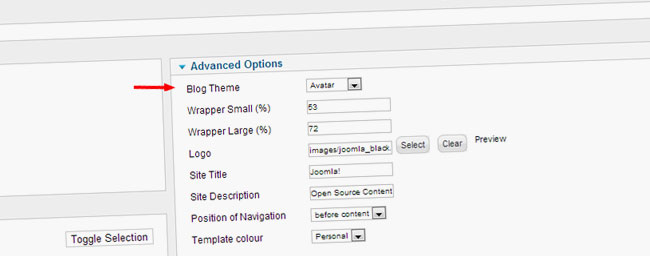
Open up the new template, go to Advance Configuration, and select 'Datetime' for the Blog Theme and then pick the menu that you have created just now. Save the configuration.
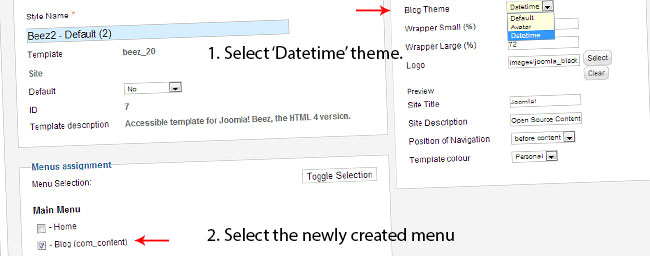
Now everytime the menu is viewed, Joomla will use the duplicated Joomla template with Datetime theme to display the article. Since we do not override com_content layout yet, it will display default Joomla style at the moment. Proceed to the next chapter to start playing around with Joomla article styling.
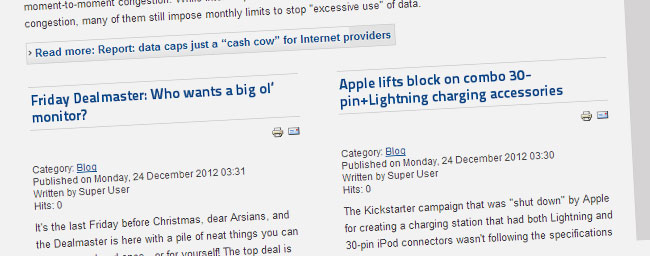
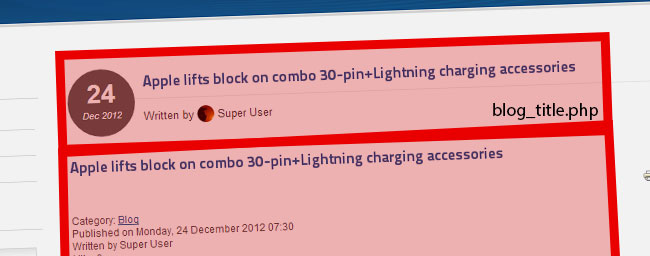
Improving article title to have blog elements
A typical Joomla article layout is simple and feature-less. In a standard setup, it will only display a title, author name, and category information. The first step into having a richer, blog-esque layout is to inject some elements into the title. In this example, I will show you how to integrate Gravatar into the title and also a way to highlight date/time information seen in most blogs. By doing so, you'll get the look of popular Joomla blog extensions to a certain extent.
4. Overriding article title in view=category.
We are now ready to start.
Copy 'blog_item.php' file in
|- components/
|--- com_content/
|----- views/
|------- category/
|--------- tmpl/
and paste it into
|- templates/
|--- current.joomla.template/
|----- html/
|------- com_content/
|--------- category/
Create the com_content directory if you dont have it in your Joomla template.
Make another copy of blog_item.php and rename it to blog_item_datetime.php. The structure will resemble this:
|- templates/
|--- current.joomla.template/
|----- html/
|------- com_content/
|--------- category/
|-----------| blog_item.php
|-----------| blog_item_datetime.php
Blog_item.php is the file responsible for styling individual articles when we browse view=category menu.
5. Activating Datetime theme. Open up blog_item.php and locate this code in the header:
Change it to:
What the code does is it will tell Joomla to use blog_item_datetime.php if the Joomla template parameter is configured to use Datetime theme. Next step would be the fun part where we'll start modifying blog_item_datetime.php to display a cool blog theme for the articles.
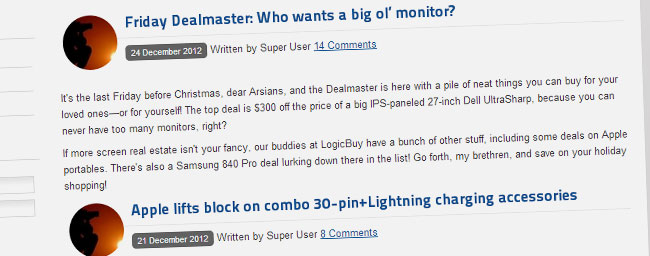
6. Adding date/time element in blog_item_datetime.php. Open up blog_item_datetime.php file and add this code immediately after the Joomla header.
The top part of blog_item_datetime.php will resemble this:
7. Adding Gravatar support. As you can guess, the above will be used to retrieve the correct author and date/time information for that particular blog. Now we need to add Gravatar integration in Joomla article. Add these codes immediately after the above code for us to structure the information that have been retrieved just now.
Notice that via a single line of code, you can easily retrieve the user's avatar from Gravatar? It is really that simple. The above codes will show the blog article in an unstyled manner. Paste this style into blog_item_datetime.php to style the blog and give date/time a more prominent design.
If you have been following me closely, your 'blog' menu should be displaying date & time information along side the user's gravatar. Dont worry about the duplicated titles, we will handle it shortly. As highlighted, the top part is generated using blog_item_datetime.php.
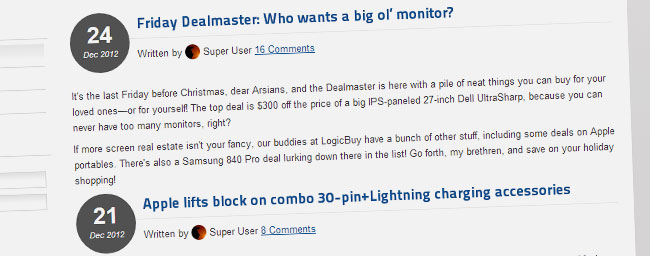
8. Adding Disqus comment count in title.
Disqus is a free commenting service. Before proceeding with Disqus integration in Joomla, please get a free account by registering at Disqus.com. Once done, copy and paste this code into the bottom of blog_title.php. Dont forget to update var disqus_shortname = 'jomsocial'; to use the actual shortname that you have registered.
Once you have followed Instruction 1-8, the title for all articles in 'blog' menu are now updated with the new design.The blog title in 'blog' menu should resemble something like this.
This code will add Disqus comment count within the article/blog title.

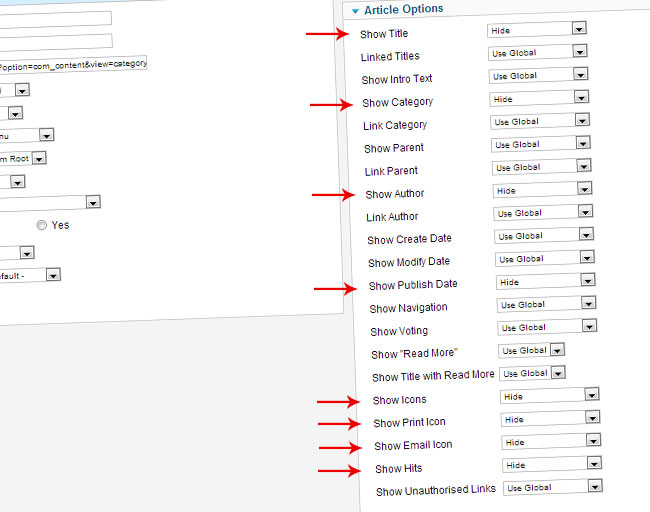
9. Removing duplicated titles
As shown above, we now have a small problem, each article is displaying dual titles and we should remove one of them. Doing so is really straightforward. We need to configure the menu for 'Blog' to hide the title in articles because we have already duplicated it in blog_item_datetime.php.
Go to Menu > Main Menu > 'Blog' menu and configure the menu to be exactly this:
Your 'blog' category is now displaying something similar to this:
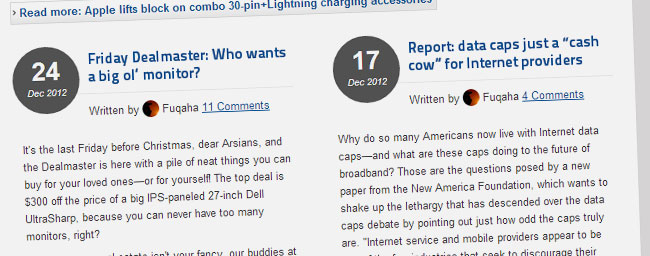
We are almost done! Just follow the next few steps and you will have yourself a free, very stable, and highly customizable blog system in Joomla.
10. Overriding singular article title in view=article.
However, once you browse individual article, notice that the title reverts to default Joomla styling? Well, we need to modify the code responsible for displaying the title in a singular article or view=article mode.
Copy 'default.php' file in
|- components/
|--- com_content/
|----- views/
|------- article/
|--------- tmpl/
and paste it into
|- templates/
|--- current.joomla.template/
|----- html/
|------- com_content/
|--------- article/
Create the com_content directory if you dont have it in your Joomla template.
Make another copy of default.php and rename it to default_datetime.php. The structure will resemble this:
|- templates/
|--- current.joomla.template/
|----- html/
|------- com_content/
|--------- article/
|-----------| default.php
|-----------| default_datetime.php
default_datetime.php will be the file that our template will use to display Blog articles.
11. Applying blog theme only on 'Blog' articles. Similar to step #5, we need to tell Joomla that only articles within the 'blog' menu are to be displayed using a blog theme and when we display it, it will use a specific theme file.
Open up default.php in
|- templates/
|--- current.joomla.template/
|----- html/
|------- com_content/
|--------- article/
Locate this header in default.php
Change it to:
12. Creating default_title.php. The above code tells Joomla that whenever a singular article in 'blog' menu is accessed and if the Joomla template is configured to display 'Datetime' theme for that menu, we will use a default_datetime.php theme.
Edit default_datetime.php file in
|- templates/
|--- current.joomla.template/
|----- html/
|------- com_content/
|--------- article/
Locate this header in default_datetime.php
Change it to:
Immediately after the above code, add this code to structure the information:
And then add this code to style the new structure:
Also, add this code to add Disqus comment count into the blog title. Similar to step 7, updatevar disqus_shortname = 'jomsocial' to use the actual shortname that you have registered with Disqus.com.
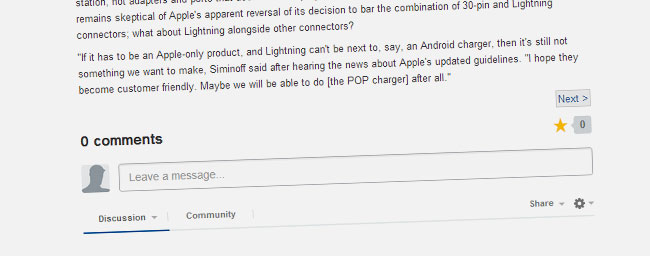
13. Adding Disqus comment system in the article.
You are almost done with the transformation. To add Disqus commenting feature into the article,
open up default_datetime.php in
|- templates/
|--- current.joomla.template/
|----- html/
|------- com_content/
|--------- article/
and locate the line (at the very end).
Paste this code exactly after that line. Dont forget to update var disqus_shortname = 'jomsocial'; to use the actual shortname that you have registered.
Once default.php is saved, reload your blog article, and you will see that it now has a Disqus commenting system at the bottom of the article. Neat huh? :-)
Download the com_content themes
Unzip and upload the content of the package to the directory below. Make sure the uploaded folder is 'com_content', rename if necessary.
|- templates/
|--- current.joomla.template/
|----- html/
To configure your preferred template, follow step 1-3 outlined in this tutorial.
Advantages of using com_content as the blog system
There are several significant advantages of using com_content that I can foresee.
First and foremost, it is really stable and well-maintained as after all, it is part of Joomla core system. Since Joomla is coming up with new major versions every 6 months, you will not be worried about having to keep up with upgrades as it is already handled by Joomla's upgrade script.
Secondly, relying on com_content would allow you to take advantage of hundreds of free content plugins to extend the functionality of Joomla articles. These are some areas in Joomla! Extension Directories that you may be interested to visit:
- Social sharing extensions allow you to embed Facebook Likes, Pinterest, Google Plus, and Twitter buttons in your articles
- News Display extensions offer hundreds of modules made exclusively for com_content integration in almost every scheme that you can think of.
- Tagging and cloud tags enable your article to have tag cloud feature that is seen in most blogging platforms.
With com_content, you will be able to have a strong control over permission and security of article categories, which can be so granular that you can even explicitly define who can view a particular article, edit or write it. With built in integration with Joomla's ACL system, you will have the ultimate control over your content. You may setup a very complex ACL rules within Joomla and rest assured that when the next Joomla comes, you will be able to upgrade with ease. Awesome, isn't it?
One thing that you may find lacking with using com_content as a blog system is the absence of a good centralized dashboard for users to manage their articles. JED comes to the rescue again with several highly ranked content submission extensions which I may say works pretty well.
This tutorial is based on
Epilogue
Well, I hope you'll find this tutorial helpful and shed some light into the nature of our blog as requested by our dearest users. Im off to jomSocial 2.8 development now. Do share your tips and tricks in the comment below!
Merry Christmas and God bless.