-
Written by iTeam

- Published on
- Hits: 11074
Joomla 4 Tutorial: How to Change session handler in Joomla 4

Session timeout is an important feature of Joomla that helps to stay user on site for a long time depending on the timeout settings. In this blog post, we will discuss in details about the working of Session handler on Joomla 4.
Note: This tutorial can be used for Joomla 3.
What is Joomla Session handler :
A Joomla session is a limit of the time that allows the user to stay on site after he logged in on frontend or backend. Till the user is active on site he can do changes on site. The default limit of the session timeout in Joomla is 15 Minutes. If a user is idle for 15 minutes, Joomla will log out that user and he need to log in again on site.
Types of Joomla 4 session handler :
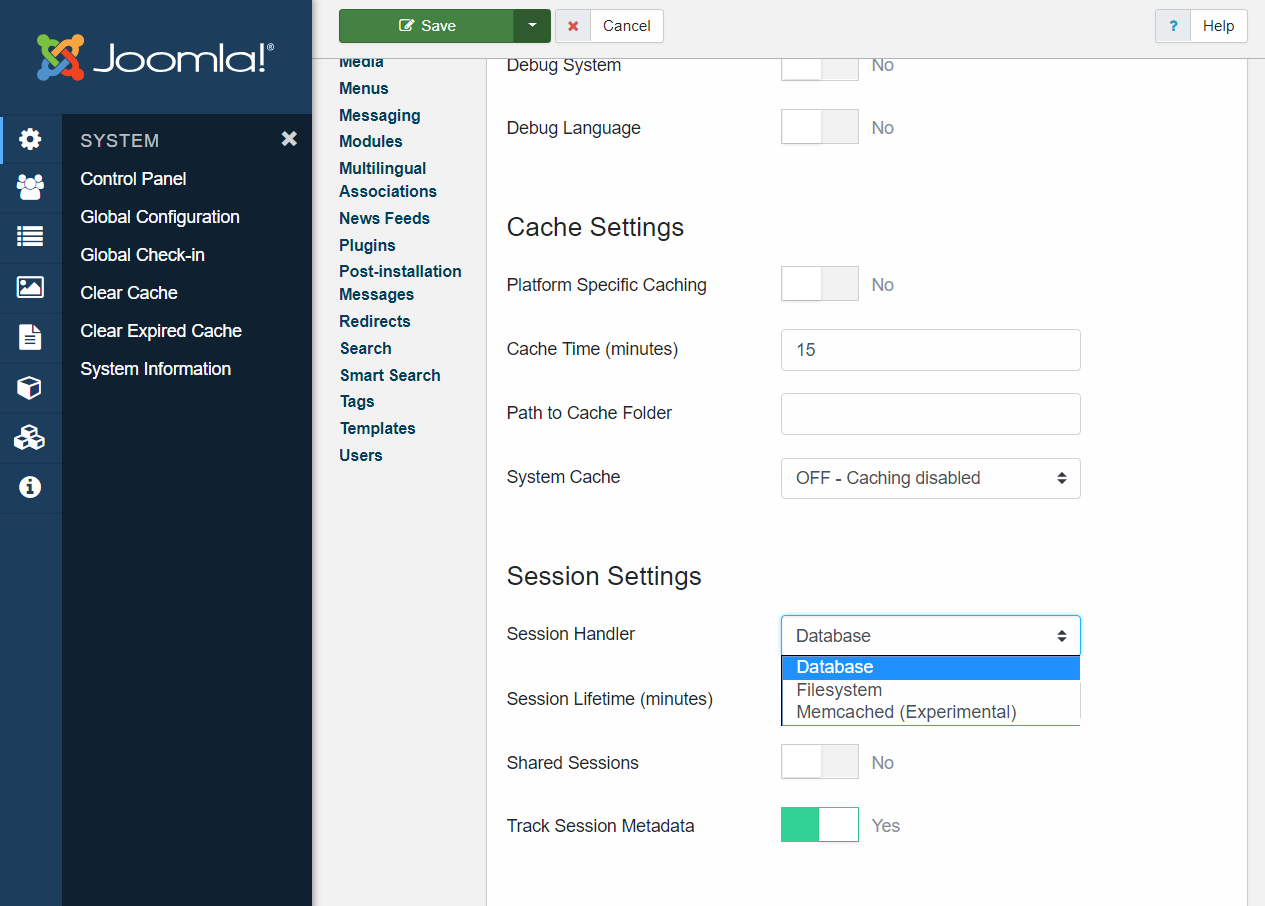
- Database handler
- PHP / File handler
- Memcache (Experimental)
- Joomla 4 Tutorial: How to use custom fields in Joomla contact forms
- How to secure your Joomla 4 website login using Two Factor Authentication ?
- Joomla 4 is ready with accessibility support
- Joomla 4 Faqs : All you need to know
- 8 most exciting Joomla 4 new features
- [INFOGRAPHIC] 9 exiting Joomla 4 new features introduction
- JomSocial On Joomla 4. What to expect?
- Joomla 3 and Joomla 4 features comparison: 15 new things to take note

Database Handler:
By default, the session handler is set to the database and it records all the data in the database session table. Whenever a user performs an activity the session handler will reset the time limit.
PHP Handler :
It is more advanced handler to save the session as compare to the database session handler. It saves the session in by PHP handler, Please note if your server does not support this, do not enable this as it can block the login on site. If you are 100% sure about the PHP handler support, in that case, enable this option.
Memcache (Experimental)
It is purely experimental and user server host and server port. Do not try this for live sites
How to configure Joomla 4 Session timeout
1. Log into your Joomla 4 admin panel.
2. Now navigate to System > Global configuration menu > Switch to System tab
3. The default setting for Session Lifetime is 15. The value you will enter for Session Lifetime is in minutes.
4. Change the settings for Session Lifetime to as per needs and click “Save” button.