Setup cron job / scheduled task

For JomSocial to run properly, you will need to set up a cron job to run periodically. By unloading some processing task to a scheduled job, JomSocial will be able to run faster and smoother.

The cron job is required to

  • avoid excessive processing during a normal page load
  • to send out system emails.
  • archive old activity stream log that are no longer relevant
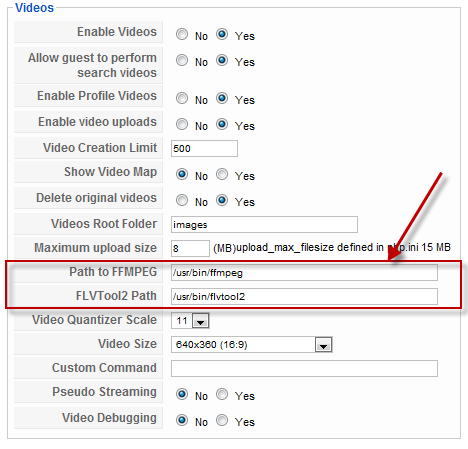
  • converting uploaded videos to standardized .swf files.
  • perform optional administrative job such as remove old, unused photo album, which doesn't have any photos

Built-in Cronjob option

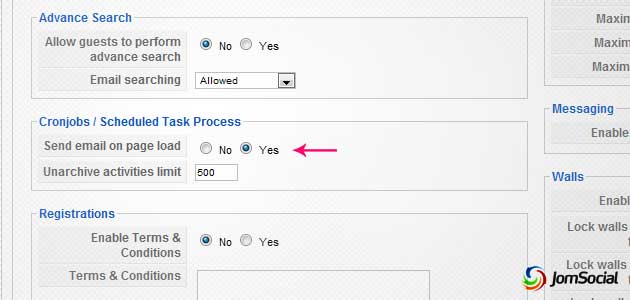
Use this option if you are not using JomSocial video upload feature. By enabling this, JomSocial will process cron on every page load, with an interval 5 minutes in between. 

This option will only process email-related crons. It will not run any maintenance script, Amazon S3 transfer or video conversion.

Avoid this option if your site is heavy with concurrent users (10+ users) at one time because it may have effect on performance
Avoid this option if you enable video upload feature and rely on other cronjob methods instead.

Cron on Linux Systems

On most Linux system, you can simply run the command below. We would recommend to run the cron every 30 minutes of less. On a busy site, you might want to run it every 10 minutes. The more frequent you run it, the less load it will be on the server.

lynx -source "http://www.domain.com/index.php?option=com_community&task=cron" > /dev/null

lynx is a text based browser that is installed in most hosting environments. If you do not have lynx installed, you can use other alternatives such as wget as below:

wget -O /dev/null "http://www.domain.com/index.php?option=com_community&task=cron" > /dev/null

Don't worry, this operation actually runs very fast and has very little impact on the server, equivalent to a normal single page load.

NOTE: When setting up this command, make sure and put in your full valid domain name, 'localhost' will not suffice.

Setting up cronjob in CPanel 11

To add a new cronjob in CPanel 11 variants, logon to your CPanel and click on the "Cronjobs" link under the "Advanced" section as the screenshot below.

Image:cronjob1.jpg

Upon clicking on the cronjobs, you will then be directed to a page similar as below. In this example, click on the "Standard" button to proceed.

Image:cronjob2.jpg

Then on the screen below, enter the following options,

Commant to run: lynx -source "http://www.yoursite.com/index.php?option=com_community&task=cron" > /dev/null

- Select every 5 minutes, every hour, every day , every month and every weekdays so that the action above will be executed every 5 mins of the day, in any given month.

Image:cronjob3.jpg

Note: In order for the emails to be sent and videos to be converted, the scheduled task must be executed correctly.

Cronjobs in GoDaddy

GoDaddy doesn't support cronjobs from the panel. Using an online cron scheduler (look below) should solve the problem.

Free Online Cron Scheduler

If you are still having trouble with the above options, use any free online cronjob scheduler service available on the web.

Do not worry on security because what these sites do is merely accessing index.php?option=com_community&task=cron at certain interval, which is open to anyone.

Popular services are:


Before you begin

Make sure your web hosting environment has meet the minimum system requirements.

If you are upgrading JomSocial, please refer to this documentation.

Installing the component

Installing JomSocial is really straightforward. After downloading the file, make sure you extract it first.


You will be using 'com_community_[version].zip' for the installation

Let's get started:

1. Login to your Joomla administration area and go to Site > System Information > Directory Permission. Make sure all directories listed are writable.

2. Go to Extensions > Extension Manager. At Upload Package File, browse for the 'com_community_[version].zip' file and choose it. Then, click on "Complete your installation" to begin.

3. The JomSocial Installer screen appears. Make sure all the requirements are checked as 'Yes'. Click on 'Next' and wait until the installation finishes.

4. You will be greeted with the Installation Completed screen. Congratulations!


Alternative installation method

You can also install JomSocial by manually uploading all the files to your web host via FTP. Follow the steps below:

1. Extract the 'com_community_[version].zip' file.

2. Upload the extracted folder to your joomla/tmp directory using your FTP client.

3. Go to Extensions > Extension Manager. At the "Install from Directory" section, point to the folder that you have uploaded just now. Then click on Install.

What's next?

Go to your Joomla front page, and you will notice a new menu item called "JomSocial". Users are now able to register, add friends and share photos in your community!


How to check for system specifications yourself

You can check most of the below requirements by heading to your Joomla backend on Help > System Info > System Information and PHP Information tab. However it is best for you to consult your webhost to have a definite overview of your server configuration.

Basic system requirements

JomSocial is an extension for Joomla. To be able to use JomSocial, you would first need to install Joomla on your web host.

We recommend using the latest stable version of Joomla (currently 2.5) to enjoy its latest features and security improvements. JomSocial support the minimum requirement of:

For the server, make sure it has:

  • PHP 5.3 or above
  • MySQL 4.1 or above

JomSocial also requires several PHP extension, which are available in most host:

  • GD library, at least v1.8 with libjpeg
  • cURL library
  • zip
  • fsockopen

That's about all you need for most JomSocial basic functionality to work. For more advanced features including faster photo upload, video upload, and Facebook Connect--follow the sections below.

Photo upload requirements

To process image, photo upload relies heavily on GD Library which uses a lot of memory. For a better performance, opt for ImageMagick instead if your server support it.

Minimum: GD library
Recommended: ImageMagick; to get it running, it also requires exec/passthru/shell_exec/system access

Video upload requirements

Video linking

Linking from external websites such YouTube, Metacafe and Vimeo only requires cURL to be installed, which is available on most host:

  • cURL library

Video upload

Video upload uses FFMPEG to convert videos. Most shared webhost disable this option because it consumes a lot of memory and processing power. Please consult your webhost on the availability of FFMPEG on your server. It is advisable to have at least VPS before you consider allowing video upload.

Minimum: FFMPEG; to get it running, it also requires exec/passthru/shell_exec/system access
Optional: FLVTool2, for adding metadata to your video

Unlike other extensions, the path to FFMPEG and FLVTool2 need to be specified on your JomSocial backend. Go to Site > Configuration and look for the "Videos" section. There you will find the fields to set both path.

One last thing that JomSocial needs to process the video is Cronjob (scheduled task). Make sure your cronjob is configured accordingly by referring to this documentation.

Facebook Connect requirements

Before you start implementing Facebook Connect feature in your website, make sure you have read the Facebook Connect Policy.

All of the extensions needed for for Facebook Connect have already been mentioned in the basic requirements, including:

  • GD library
  • cURL library
  • fsockopen

Please also ensure that there are no Javascript or jQuery clash on your site because it will lead to error in executing Facebook Connect mechanism. We recommend you using Firebug (a Firefox addon) to inspect such issues.

Large photo/video upload

When it comes to large photo/video uploads, there are a few server configurations that you can tweak the get the most out of JomSocial:


php.ini

max_execution_time = 9000; Maximum execution time of each script, in seconds
max_input_time = 9000; Maximum amount of time each script may spend parsing request data
memory_limit = 1024M; Maximum amount of memory a script may consume
post_max_size = 1024M; Maximum size of POST data that PHP will accept.
upload_max_filesize = 1024M; Maximum allowed size for uploaded files.

my.cnf

wait_timeout = 120
connect_timeout = 120

Disable safe_mode and open_basedir

Some hosting providers have safe_mode and openbase_dir enabled. In order for the photo/video upload to work, you have to disable them. If your hosting allows you to override the Apache's configuration, you need to override the vhost configuration.

php_admin_flag safe_mode off
php_admin_value open_basedir none

If your webhost allows for .htaccess override, locate your .htaccess file in the root Joomla directory and add these lines into it:

php_admin_flag safe_mode off
php_admin_value open_basedir none

A note on PHP memory requirement

JomSocial is developed to run adequately on system with just 32Mb memory allocated to PHP. However please be informed that the development site uses the default template with no additional third-party modules & plugins enabled. Sites with third-party plugins and modules enabled will consume a lot more memory thus we recommend you to increase your memory limit.

Having said that, any application will run well with more memory. We recommend that you allocate at least 64Mb of memory to PHP. The following task will consume a lot of memory:

  • resizing uploaded user avatar
  • resizing any photos uploaded by user
  • converting uploaded videos to Flash .swf

Join 180,000 websites creating Amazing communities

JomSocial is the most complete, easy-to-use addon that turns Joomla CMS into a
full -fledged, social networking site

TRY NOW BUY NOW